
In this post, I’ll describe the process, step by step, of how I made a custom terrain board for the cooperative tabletop board game Fearsome Wilderness.


In a previous blog post, Modular Wargaming Terrain: A Low Cost How-to DIY, I described my process for making a large modular terrain board for Warhammer 40K and it was a popular post so now that Geektopia Games has released our own tabletop board game, Fearsome Wilderness, I though it might be fun to do a similar post but for a game board that would be specific to Fearsome Wilderness.
Terrain has always been something I really enjoy making and since we often spend countless hours painting and perfecting our hero and monster minis, it makes sense to me to spend at least a fraction of that time on the board on which you will be playing.
If you are a Warhammer or Warhammer 40K player, those realm of battle boards from Games Workshop are very nice but very pricey so in the previous blog post mentioned above, I took it upon myself to save some money and make my own board. I liked saving the money and I also liked the idea of having a one-of-a-kind custom board that I made myself. It was easy, and you can do it too. I’ll explain my process below.
Because the game already comes with a really nice board, you can ignore this whole update and continue on with your day if you want BUT if you enjoy crafting terrain like I do, then read on and we’ll give some tips and inspiration for making your own game board.
Overview:
This hobby tutorial explains how to make your own board for Fearsome Wilderness. If you are not familiar with our game, check it out here.
The board that comes with the physical copy of the game is very nice and has great detail on it already. We wanted to make it look like a wargaming battle mat or D&D mat that you may be used to.

It’s also double sided because in the game, once you have played the campaign for 12 sessions (which each represent 1 week), then you must flip the game board over and play with the Winter rules which are more difficult.

The game board has 2 distinct features you must include. On one side is the lake and its beach and the other side is the creeping darkness where dangerous fearsome critters will emerge. The creeping darkness side doesn’t need anything special because you will just paint it darker but for the lake side, you may want to think about this ahead of time and decide how you want to make the water effect.
Each space on the board is 8.5 x 11 inches in size. The entire board is 42.5 inches long x 11 inches high. I originally intended on making 5 separate boards for easier storage but I took a look at my styrofoam sheet that I was planning on using, and it was almost the perfect size already. Feel free to make the board whatever size you want and just make you designate 5 spaces on it. I have used thicker “pink foam” style insulation on other wargaming boards (sometimes it’s blue or purple) and that works good too. You can get the styrofoam or “pink” foam insulation from your local hardware store or on amazon although I’ve found the hardware store usually has better prices. you could also but a piece of MDF board under the foam if you want to make it sturdier but also heavier.

What you’ll need:
The main component is the foam board. I got this from home depot. Prices vary here but it wasn’t too much. For the whole pack of styrofoam sheets it was probably $10-20 cost.
To cut the foam, you’ll need some sort of foam cutter. Basically these are electronic devices that heat up a wire and let you slice through the foam. This is a larger expense ($20 range) but its a tool you can keep and use over and over again. I love mine. Check out Amazon for lots of options.


Next you’ll need plaster or caulk. Just regular white acrylic latex caulk will work. Its $1-2 a tube but you’ll go through a lot of this.

You’ll need pva glue or a hot glue gun. While the glue gun is optional you might want it. I’ve seen them for as little as $7 on amazon.

Lastly, you’ll need… paint of course. Don’t use spray paint here as it may will eat away at the foam. Also, you’ll need a lot of paint so a can of latex paint is the most cost effective.
You’ll paint this up just like you would your miniatures. Get low cost paints and definitely don’t use the same paint you would for your minis. You’ll need a quart probably and just get basic stuff. Then use the same techniques like base coating, applying a wash, then dry brushing, etc. I used latex indoor paint for the base coat and some cheap apple barrel paints for the details.

Optionally, you can buy some flock to sprinkle over (or completely cover). Get a blend or make your own blend and make sure to get some browns for trails and worn areas. A little bit of yellow will add to the green patches if you so desire. I like the stuff from Woodland Scenics.

Step One:
Soak some rocks in bleach. We want the board to look alive but not actually be alive. I got some rocks from the ground outside. Cost: $0

Step Two:
Carve lines for the spaces with the hot foam cutter. This will make it so the spaces are obvious when playing the game. If you are using 5 separate pieces of foam, then you are already good to go.
Measure it out and draw a straight line first as a guide.


Cut the beach at an angle so it slopes toward the water and you can add a water effect later and glue some sand on it later too.

Save some scraps to make some optional plateaus or hills. Use the foam cutter to make wavy or irregular edges.

Then glue the foam pieces to the board. A hot glue gun comes in handy here if you have one because you don’t have to wait as long for it to dry but regular pva glue is fine too.

Step Three:
Optionally take a ball of aluminum foil, ball it up, and roll it over the board to add some more texture to it. Less is more.


Then spackle the entire board. By this I mean spread plaster or caulk all over the board. If you are using plaster, add a little water to the container. If its caulk, just add water to your brush or the board. This doesn’t need to be too thick, its only there for texture. Make texture by pressing down so you get bumps and a textured look. Don’t go crazy here, less is more. If your peaks are too big, spread it out more. You just need little bits of texture and when you dry brush it, it’ll look fantastic.

Add some rocks to the plaster if you like.


I think the best technique is to use the foil ball method and then plaster or caulk to add texture. It looks great and its easy. I have seen others use a mist of spray paint to “eat away” at the top of the foam. Feel free to experiment and use whatever tricks you think look best.
Step Four:
Paint it up and you’re done!
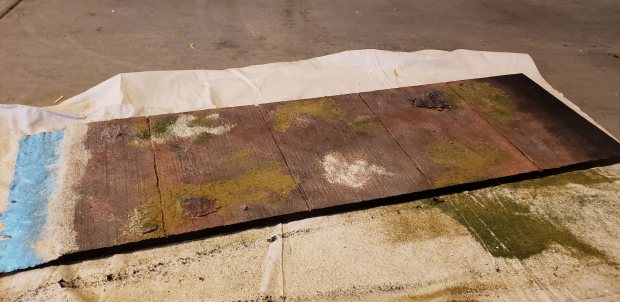
Base Coat
Don’t use your expensive paints here, you’ll need a lot of it.

Wash/Shade
Dilute some darker colored paint and let is pool in the recesses.

Dry Brush and Optionally Add Flock
mix up some lighter colored paint. Use the same color base coat and mix in some white. Then dip the tip of your brush in the paint and then brush some cardboard or paper towel until its dry and there’s barely any paint on the brush. Then brush the board in different directions to highlight the edges and peaks of the plaster.

If you are going to flock, spread PVA glue all over or use a spray bottle (like an old windex bottle) to lightly coat the surface. Then sprinkle on your flock. Then spray with glue again over top. This helps keep the flock from falling off and adds a protective coating to the board.

You could also apply a spray matte varnish over top at the end too if you think you’ll be rough on your board and want that extra layer of protection.
Once the glue drys, it looks normal. Don’t worry the glue will dry clear.
Step Five:
Paint the water, add sand, and then optionally add epoxy or resin to create a water effect. Then paint the creeping darkness at the other end of the board.

Next add some glue to the beach area and cover with sand. After that I painted the creeping darkness and tried to blend it so its a gradient effect.

Paint the edges black or brown

At this point I could have maybe stopped and just finished the lake, but I went back and painted some of the board by hand.


I also want to try and do a cool water effect with epoxy. I might add some more rocks and other features too. I’ll update the blog post with more later and show final photos when the lake is done. If I wasn’t going to do a epoxy water effect, I would now go ahead and paint the peaks of the waves white and cover the lake with PVA. Once you let the PVA glue dry it will look glossy.

Check out Fearsome Wilderness on Kickstarter

Now you can go enjoy your new custom Fearsome Wilderness game board.
This technique can be used to make all kinds of boards. I made my daughter boards for her Moana and Frozen toys and she loves it.
For inspiration, check out this video of Roman Khramov of minibricks.co making some incredible terrain and realistic water effects.
Thanks everyone